

Git Features
At Rubico, we use Git to manage our source code. This is one of the most important parts of our daily work. In general, we mostly use the basic Git commands.
Reading Time: 6 minutesAt Rubico, we use Git to manage our source code. This is one of the most important parts of our daily work. In general, we mostly use the basic Git commands in projects, like Git clone, Git pull, Git checkout, Git add and Git commit, although in some cases we need advanced Git features to check our work.
Often we ask questions like: What are the differences in our code files and branches? How do we download a piece of code? How can we merge changes to remote? This blog will help you answer these questions and provide you a brief summary of some advanced Git features.
1. Cloning a Specific Branch
As mentioned in the previous blog, an existing repo can be cloned using the Git clone command, but what if you need to clone only a specific branch of the repo? For example, if you have master, staging, and development branches, you may just want to clone the staging branch.
To fetch a specific branch’s content, you need to trigger the same Git clone command along with the branch name you want to clone. See below:
- git clone -b <branch name> –single-branch <repo path>
Note:
You need to mention the name of the branch, such as staging or development, and the path of the Gitlab or Github repo. This command is useful to fetch the required branch quickly to fix the issues in a big project.
2. Create an Orphan Branch
If you want to share your branch with someone else with no history, you can do that by creating an orphan branch. An orphan branch is a separate branch that starts with a different root commit. So the first commit in this branch will be the root of this branch without having any history. It can be accomplished by using the Git checkout command with the ––orphan option.
- git checkout ––orphan <branch name>
Note:
This command is useful whenever you need an independent branch without any relation to any other available branches.
3. Reset Your Branch
Git reset
Another one of the advanced Git features can be used to reset your branch, revert, or rewind to the last commit. By default, it will rewind to the last commit, but you can pass on a commit hash with the command to revert it to a specific commit. This command has two different options; ––hard and ––soft.
- git reset –hard <#commit hash>
This command will revert your branch to the specific commit. All commits that come after this version are effectively undone; your project is exactly as it was at that point in time.
- git reset –soft <#commit hash>
This command will revert your branch to a specific commit but will keep your changes on your local machine. The next time you change anything to that file, that file will reflect in the Git status.
There could be much safer ways to do it. For example, you can restore or rebase a revision in a new branch. See below:
Restore a revision in a new branch
- git checkout -b <branch-name> <#commit-hash>
4. Maintain the clean history
Git rebase
One of the most helpful advanced Git features, Git rebase, fetches the latest commits from the Master branch and puts your code on top of that. It helps maintain a clean history of the project.

Note:
There are cases when rebasing may create a problem for you. For example, if your branch is active, long-lived, or separated from the Master branch for a long time, and then you would like to rebase your branch with the Master, this may cause issues, because, after a length of time, there would be many changes in the Master branch that could impact your branch code. Your code could even break the features of the application. In order to overcome this situation, be sure to frequently rebase with the Master branch.
Git log
We all use source code tools to check the history of the changes. Git log shows the commit logs. This command will display the log of past actions on the repo. For example, it will show who committed and what changed when, etc. The basic Git log command will display the logs but the output of the command can be changed by applying the different switches. For examples, see below.
If you simply type Git log, on your terminal under your project folder you will see a list of logs similar to the below image.

Let’s apply some switches to change the formatting of the log.
- git log -10
To display the last 10 commits. When someone is looking for recent commits. This will display only the last ‘n’ number of comments based on your inputs.
- git log –oneline
To display the information in one line use ––oneline option/switch with Git log command. And the output would be similar to the following.

- git log –author <author name>
This will show the history of a particular user who authored the changes.
- git log –pretty=format:
This switch shows the formatted result of the commits. You can use the %h for commit hash and %cn to display the name of person who committed.
- git log –pretty=format:”The commit %h is applied by %cn”

5. Checking differences and apply a specific commit
Git diff
As the name explains, it finds the difference between files, commits and branches. Developers can then see the difference between two sources and detect the changes.
- git diff <file1> <file2>
- git diff <commit hash> <commit hash>
Git cherry
Yet another one of the advanced Git features checks the commit differences between the branch you are in and the branch you type with this command. It will show you which commits are merged and which are not.
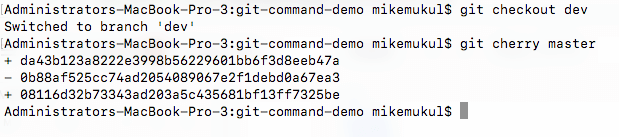
To display the commit message with the commit # use -v switch

Git cherry-pick
Git cherry-pick provides the option to apply an individual commit to another branch. For example, imagine you are in a development branch and you make several commits, but just want a specific commit to apply to the Master branch. In this case, you should use the Git cherry-pick command. By providing a reference to that commit in this command it will apply that commit to the targeted branch. Let’s see the command below:
- Go to the command you want to apply the specific commit to. In my case, I am on the Master branch.
- git checkout master
- git cherry-pick <SHA> //Note SHA is the unique commit identifier.

Now after applying the commit to the Master you can check it via the Git log command.

6. Git LFS
Git LFS is a Git extension, another one of the advanced Git features, developed by the open-source community to handle large files. When we say that we are using Git for a project, this means that all the history of the repo is stored and can be transferred to a user/developer who is cloning it. Yet large files, like graphics or media files, can slow down your cloning process significantly. To handle this, we use Git LFS.
Git LFS downloads the large files lazily during the checkout process, instead of at the time of cloning. This helps with cloning the repo. Git LFS works with the pointers instead of actual content, so that whenever someone adds a new file to repo it stores a pointer instead of the content of the file, and keeps the file in Git LFS Cache locally. Whenever you push to the remote repo, it pushes the files to the Git LFS store. At the time of checkout, it downloads the file from the Git LFS store to the local machine. In this way, Git LFS handles large files effectively and makes this process very easy and smooth.
Conclusion
I would like to mention that this is not the end of advanced Git features. Git has many, many commands and switches that can be helpful for you in certain situations. However, the most important commands are the basic command that we use on a daily basis. Rubico has had a great experience using Git in all our projects. Contact us with any questions at solutions@RubicoTech.com