iOS Development Tools
These are the essentials for mobile app developers that are just getting started
Reading Time: 8 minutesSooner or later every organization wants a customized app to help grow their business. Any aspirant iOS developer will face many challenges during the development of an application. That is why I want to share the five iOS app development tools that will help you or your team develop an iOS app efficiently.
First, your app will require a basic infrastructure. Obviously, many developers understand this. But have you heard of the tools that will make this process much more simple? Read on to learn more.
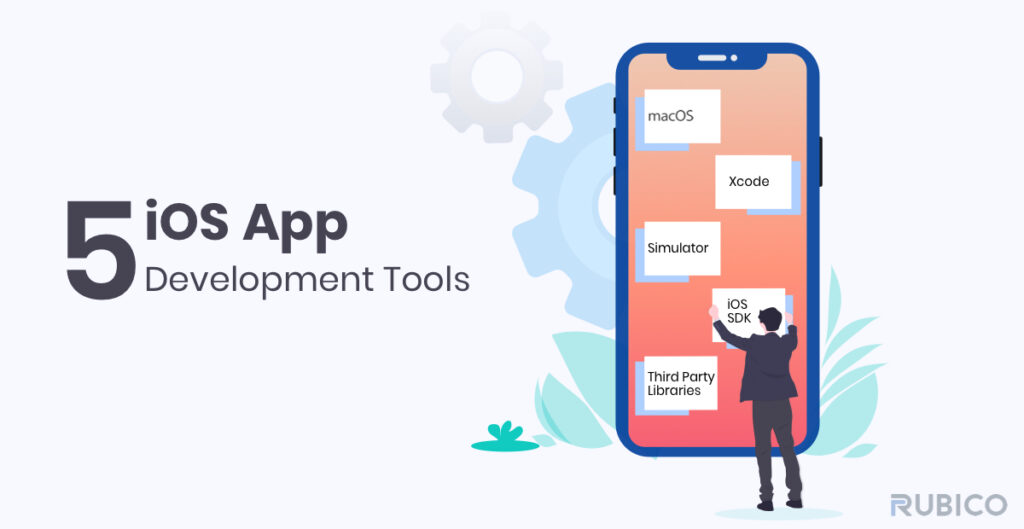
1. Basic Infrastructure
a. macOS
macOS is a series of graphical operating systems developed and marketed by Apple Inc. You will need this for development since Xcode can only work on macOS.
b. Xcode
Xcode is a fast and consistently smooth iOS app development tool. It is Apple’s IDE (Integrated Development Environment) for both Mac and iOS apps. Xcode is the graphical interface you’ll use to write iOS apps. Xcode includes the iOS SDK, tools, compilers, and frameworks you need to design, develop, write code, and debug an app for iOS. But for native mobile app development on iOS, Apple suggests using the modern Swift programming language.
c. Simulator
Simulator allows you to rapidly prototype and test builds of your app during the development process. Although it is installed as part of the Xcode tools, simulator runs on your Mac and behaves like a standard Mac app. During use it can simulate an iPhone, iPad, Apple Watch, or Apple TV environment.
d. iOS Software Development Kit (SDK)
Some iOS SDK essentials are the Cocoa Touch frameworks that include the UIKit, GameKit, PushKit, Foundation Kit, and MapKit. Use these iOS app development tools to build software much easier.
Now you have the tools that make code easier. How about when your team goes to build the framework? What tools give them an easy environment to set the stage for a well-developed app?
2. Standard practices for a project using iOS app development tools
a. Set Up the iOS Environments
It’s best to have separate environments for your iOS apps, especially if they are communicating with any servers. For instance, consider an iOS app and three different available web backend environments: development, staging, and production.
b. CoreData for local DB operation (if needed)
Core Data is one of the most popular frameworks provided by Apple for iOS and macOS apps. Core data is used to manage the model layer object in your application. You can treat Core Data as a framework to save, track, modify, and filter the data within iOS apps; however, Core Data is not a Database. Core Data uses SQLite as its persistent store but the framework itself is not the database. Core Data does much more than databases, like managing the object graphs, tracking the changes in the data and many more things.
c. Version Controlling
Version control is a system that records changes to a file or set of files over time. This allows you to recall specific versions later.
d. Git
Git is the most recommended system to manage the versions. It is a free and open-source, distributed version control system. This system is designed to handle everything from small to very large projects with speed and efficiency.
By the time you have developed a framework, you have hopefully settled on an optimal design for the app. So what is it going to be? There are various architectural structures that you can choose from, as you will find out in the next section.
3. Adopt an optimal architecture design pattern
It is very important to adopt an efficient architecture well suited for the project you are supposed to work on. Adopting an architecture helps in future enhancements and maintenance of the project if needed. Here are a few architectures to use while developing:
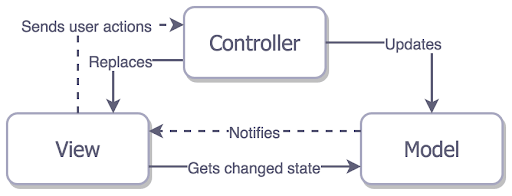
a. MVC
It stands for Model, View and Controller. MVC separates applications into three components – Model, View and Controller.
i. Model
Model represents the shape of the data and business logic. It maintains the data of the application. Model objects retrieve and store model state in a database.
ii. View
This is a user interface. It displays data to the user, using the model, and also enables them to modify the data.
iii. Controller
Controller handles the user request. Typically, users interact with view, which in-turn raises any URL request. This request will be handled by a controller. The controller renders the appropriate view with the model data as a response.
The following figure illustrates the interaction between the Model, View and Controller.
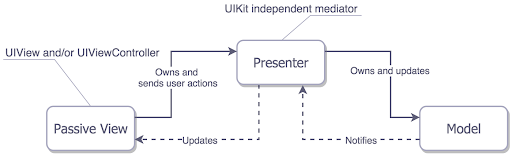
b. MVP
MVP stands for the Model, View and Presenter. Model and View work the same as in MVC. Only the Presenter plays the role as a UIKit independent mediator.
The following figure illustrates the interaction between the Model, View and Presenter.
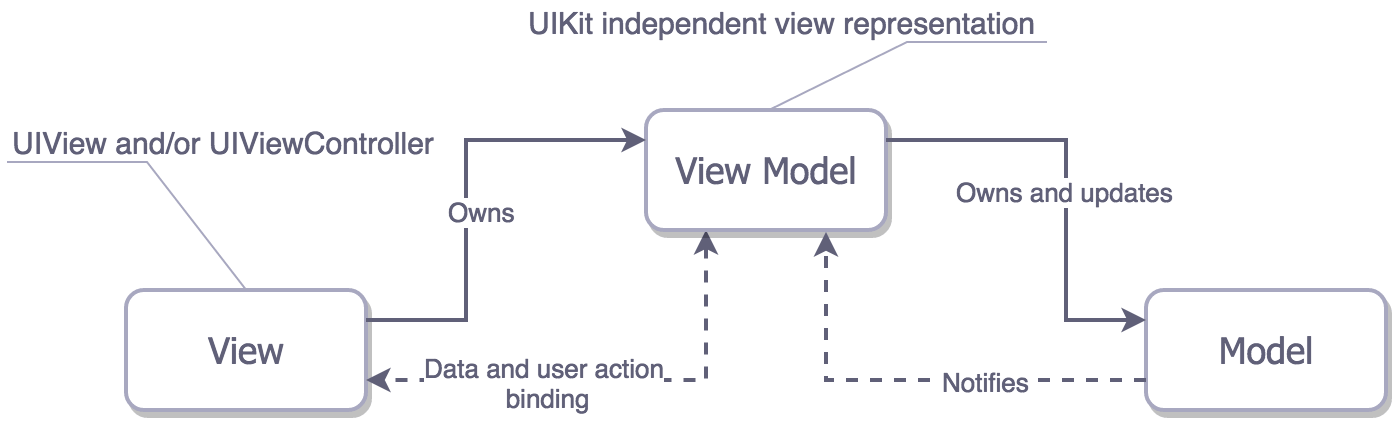
c. MVVM
The MVVM is the newest version of MV(X). We hope this new version took into account problems MV(X) faced previously. In theory, the “Model-View-View-Model” looks very good. The View and the Model are already familiar to us, but also the Mediator, represented as the View Model.
The following figure illustrates the MVVM.
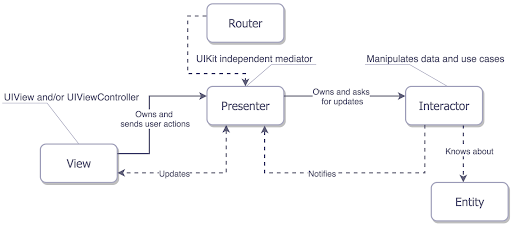
d. VIPER
This is our last candidate. VIPER doesn’t come from the MV(X) category. It separates responsibilities in five layers.
i. View
This is a user interface. It displays data to the user using Model and also allows them to modify the data.
ii. Interactor
This contains business logic related to the data (Entities) or networking. For example, creating new instances of entities or fetching them from the server. For those purposes, you’ll use some Services and Managers. These are not considered a part of VIPER module, but rather an external dependency.
iii. Presenter
It contains the UI related (but UIKit independent) business logic, and calls on the Interactor for data.
iv. Entities
This is the responsibility of the Interactor. It contains your plain data objects, not the data access layer.
v. Router
The Router is responsible for the segues between the modules.
The following figure illustrates the VIPER.
Finally, you’ve settled on a pattern for the app to follow. Now if you haven’t ever met the following library tools, let me introduce you. There is a reason these are popular among iOS developers!
4. Make use of libraries and frameworks
Because iOS is so popular there are a significant number of libraries and frameworks. They can be used to solve a number of issues. They can implement custom UI animations or work with device hardware. Consequently, these third-party iOS app development tools can significantly reduce the amount of effort and cost of building the same features from scratch.
i. CocoaPods
1. CocoaPods comes as a Ruby library and need to be installed using RubyGem. It is built with Ruby and is able to be installed with the default Ruby available on OS X.
ii. Carthage
1. Carthage is another simple dependency manager for the Cocoa application. It downloads and builds the dependencies, but will not change the project file. Xcode project builds the setting like CocoaPods. You have to manually drag a framework’s binaries to Linked Frameworks and Libraries.
2. You can install Carthage using HomeBrew.
iii. Swift Package Manager
1. The Swift Package Manager is a tool for managing the distribution of Swift code. It’s integrated with the Swift build system and can automate the process of downloading, compiling, and linking dependencies.
a. Third Party Libraries
The most important benefit of using third party libraries is that it saves you time. You do not need to develop the functionality that the library provides. Instead, you can focus on the core business logic of your app: the features that really matter. Typically, you will spend a fraction of the time it would take to develop and test an app’s functionality from scratch.
Here are few third party libraries which are well known and make a developer’s life easier:
i. AFNetworking
It is an Objective-C networking library for iOS, macOS, and tvOS. This robust library has been around for many years. From basic networking to advanced features such as Network Reachability and SSL Pinning. AFNetworking has it all.
ii. SDWebImage
SDWebImage is an asynchronous image downloader with caching. It has handy UIKit categories to do things such as set a UIImageView image to a URL. Although networking has become a little bit easier in Cocoa over the years, some basic tasks have not improved. For example, setting an image view to an image using a URL is still difficult.
iii. Alamofire
Alamofire is AFNetworking’s successor, but is written in Swift. You might be wondering why there are two different networking libraries in the upper echelon of this list. I assume it’s due to the fact that networking libraries are just extremely useful for iOS app development. The two libraries share a similar feature set. The main difference is the language in which they are written.
iv. SwiftyJson
Your life will be so much easier when it comes to handling JSON in Swift. Combining JSON with Swift can be tricky. The type casting issues make it difficult to deserialize model objects and it may require a bunch of “nested if” statements. SwiftyJSON makes all of this quite simple to do. That’s probably why it’s the second-most popular Swift library.
v. PromiseKit
PromiseKit is a popular third-party library for Swift and Objective-C programming language. Many developers use this library to simplify the asynchronous tasks they have in their apps. Promises allows you to control the whole asynchronous background process with this powerful closure syntax for chaining multiple async functions.
Now that your app is complete, you will need to distribute it. Overall does it matter how the app is presented to the world? Maybe – if you want a small selection of people to review it first. In that case find out what options are available.
5. Choose the distribution model for your iOS app
As soon as your app is ready to be shipped, it’s important to decide how you want to distribute it. Currently, Apple offers three models. The most widely used option is to upload the app directly to the App Store. This way it will become available to every iOS user.
Additionally, you can set some parameters, such as target country, supported device, or iOS versions. If you want to beta-test your app before launching it globally, you can use the TestFlight service provided by Apple. It allows you to invite up to 100 users to test the application privately.
For enterprise-level apps or internal business tools, you can use the iOS Developer Enterprise Program or Volume Purchasing Program. Although a costly alternative to the previous two methods, this approach offers complete privacy. It allows you to make the application available only for your employees and contractors.
Conclusion
In conclusion, these iOS app development tools will simplify any iOS development you or your team may do in the future. First, remember to establish the basic infrastructure. Then, follow the standard practices of creating several versions. After that, decide which architecture will be most efficient for the project. Also take advantage of third-party tools and libraries. Finally, choose how you will distribute the app. Overall, we wish you all the best in using these iOS app development tools. If you are short staffed or need an iOS consultant for the next project, email us now at solutions@RubicoTech.com.